From Drums to Discs: A Comprehensive Guide to Converting Brakes on Classic Cars
For many classic car enthusiasts, the desire to improve the safety and performance of their beloved vehicles is paramount. One of the most impactful upgrades you can make is converting the original drum brakes to a modern disc brake system. While drum brakes served their purpose in their time, disc brakes offer superior stopping power, reduced fade, and better overall reliability.
This article will provide a comprehensive guide to understanding the benefits, considerations, and steps involved in converting drum brakes to disc brakes on classic cars.
Why Upgrade to Disc Brakes?
Before diving into the how-to, let’s explore why this conversion is so popular:
- Enhanced Stopping Power: Disc brakes provide a more consistent and powerful braking force compared to drum brakes. The open design of disc brakes allows for better heat dissipation, which prevents brake fade (loss of stopping power due to overheating).
- Reduced Brake Fade: Drum brakes are prone to brake fade, especially during repeated hard braking. The enclosed design traps heat, causing the brake shoes and drums to expand, reducing friction and effectiveness. Disc brakes, with their open design, dissipate heat much more efficiently, minimizing brake fade.
- Improved Wet Weather Performance: Drum brakes can suffer from reduced effectiveness in wet conditions as water can accumulate inside the drum. Disc brakes are less susceptible to this issue due to their open design, which allows water to be dispersed more easily.
- Easier Maintenance: Disc brakes are generally easier to maintain than drum brakes. Replacing brake pads is a simpler and faster process compared to replacing brake shoes and dealing with the intricate mechanisms within a drum brake system.
- Better Modulation and Control: Disc brakes offer better modulation, allowing the driver to apply braking force more precisely. This leads to improved control and a more confident driving experience.
- Modern Safety Standards: Upgrading to disc brakes brings your classic car closer to modern safety standards, providing peace of mind on the road.
Considerations Before Starting the Conversion:
While the benefits are compelling, there are several crucial factors to consider before undertaking a disc brake conversion:
- Vehicle Compatibility: Not all classic cars are easily adaptable to disc brakes. Research whether conversion kits are available for your specific make and model. Some vehicles may require extensive modifications to the suspension or chassis to accommodate disc brakes.
- Cost: Disc brake conversion kits can range in price from a few hundred dollars to several thousand, depending on the complexity of the kit and the quality of the components. Factor in the cost of the kit, as well as any additional parts or labor required for installation.
- Technical Skill: This project requires a good understanding of automotive mechanics and braking systems. If you’re not comfortable working on brakes, it’s best to have a qualified mechanic perform the conversion.
- Wheel Compatibility: Disc brakes can sometimes require larger diameter wheels to clear the calipers. Ensure that your existing wheels are compatible with the new brake system, or be prepared to purchase new wheels.
- Master Cylinder and Proportioning Valve: Upgrading to disc brakes often necessitates replacing the master cylinder and installing a proportioning valve. Disc brakes require more fluid volume and pressure than drum brakes, so a larger master cylinder is needed. A proportioning valve regulates the brake pressure between the front and rear brakes, preventing premature rear wheel lockup.
- Brake Lines and Hoses: Inspect and replace any old or damaged brake lines and hoses. Stainless steel braided hoses are a good upgrade, as they resist expansion under pressure, providing a firmer pedal feel.
- Parking Brake: Consider how the parking brake will be integrated into the new disc brake system. Some kits include integrated parking brake mechanisms, while others may require a separate parking brake system.
Essential Steps in the Conversion Process:
Here’s a general outline of the steps involved in converting drum brakes to disc brakes:
- Research and Planning:
-
Identify available conversion kits for your specific vehicle.
-
Read reviews and compare different kits to find the best option for your needs and budget.
-
Gather all necessary tools, parts, and materials.
-
Consult with a mechanic or experienced car enthusiast if you have any questions or concerns.
- Preparation:
-
Safely lift and support the vehicle using jack stands.
-
Remove the wheels and tires.
-
Disconnect the brake lines from the existing drum brakes.
-
Remove the drum brake assemblies, including the drums, shoes, wheel cylinders, and backing plates.
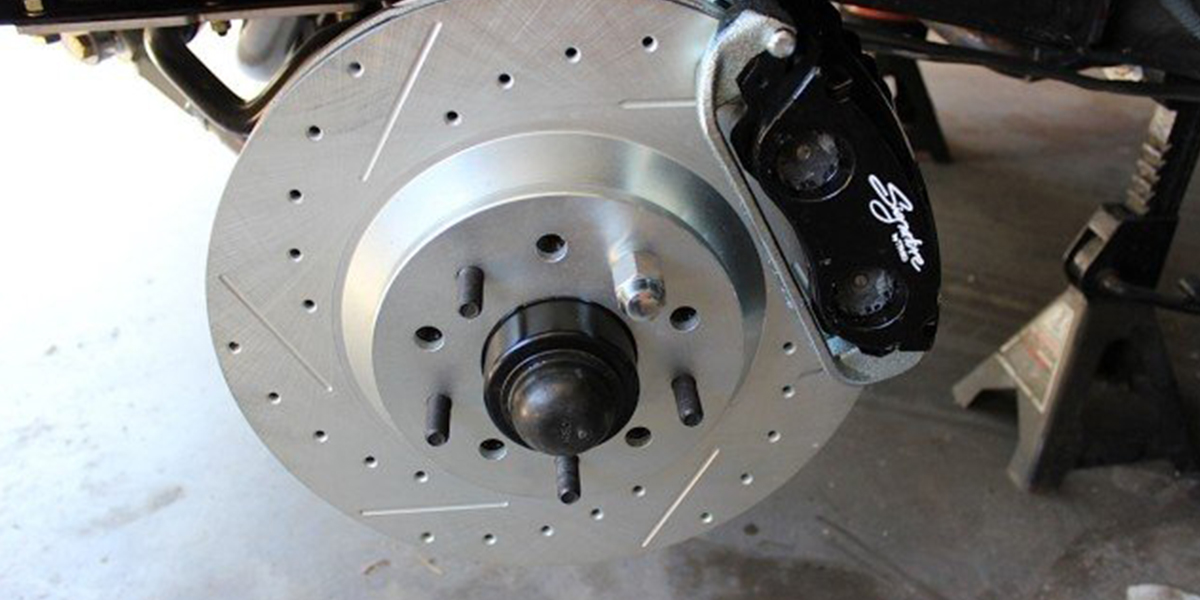
- Installation of Disc Brake Components:
-
Install the disc brake mounting brackets onto the spindles or axle housings.
-
Install the rotors onto the hubs.
-
Install the calipers onto the mounting brackets.
-
Connect the brake lines to the calipers.
- Master Cylinder and Proportioning Valve:
-
Remove the old master cylinder.
-
Install the new master cylinder, ensuring it is properly bench bled before installation.
-
Install the proportioning valve in the brake line system.
- Brake Line and Hose Replacement:
-
Inspect and replace any old or damaged brake lines and hoses.
-
Install stainless steel braided hoses for improved performance.
- Bleeding the Brakes:
-
Bleed the entire brake system to remove any air bubbles.
-
Start with the wheel furthest from the master cylinder and work your way closer.
-
Use a brake bleeder kit or have an assistant pump the brake pedal while you open and close the bleeder screws.
- Parking Brake Installation (if applicable):
-
Install the parking brake cables and levers according to the kit instructions.
-
Adjust the parking brake to ensure proper engagement.
- Wheel Installation and Testing:
-
Reinstall the wheels and tires.
-
Lower the vehicle to the ground.
-
Test the brakes thoroughly in a safe area.
-
Check for any leaks or abnormalities.
Choosing the Right Conversion Kit:
Selecting the appropriate conversion kit is critical. Here are some key considerations:
- Quality of Components: Look for kits that use high-quality rotors, calipers, and brake pads. Reputable brands often offer better performance and longevity.
- Completeness of the Kit: Ensure that the kit includes all necessary components, such as mounting brackets, rotors, calipers, brake pads, hoses, and hardware.
- Ease of Installation: Consider the level of difficulty involved in installing the kit. Some kits are designed for easy bolt-on installation, while others may require more extensive modifications.
- Customer Support: Choose a kit from a reputable manufacturer that offers good customer support and technical assistance.
Potential Challenges and Troubleshooting:
Even with careful planning, you may encounter challenges during the conversion process. Here are some common issues and how to address them:
- Fitment Issues: Sometimes, parts may not fit perfectly due to manufacturing tolerances or variations in vehicle models. Be prepared to make minor adjustments or modifications.
- Brake Line Leaks: Ensure that all brake line connections are tight and properly sealed. Use Teflon tape or sealant on threaded fittings to prevent leaks.
- Soft Brake Pedal: A soft brake pedal can indicate air in the brake lines or a faulty master cylinder. Bleed the brakes thoroughly and inspect the master cylinder for leaks or damage.
- Uneven Braking: Uneven braking can be caused by a faulty proportioning valve or uneven brake pad wear. Adjust the proportioning valve or replace worn brake pads.
Conclusion:
Converting drum brakes to disc brakes is a significant upgrade that can dramatically improve the safety and performance of your classic car. While it requires careful planning, technical skill, and attention to detail, the benefits of enhanced stopping power, reduced brake fade, and improved reliability are well worth the effort. By following the steps outlined in this guide and addressing any challenges that may arise, you can enjoy a safer and more enjoyable driving experience in your classic car.
