The Ultimate Guide to Child Safety Seat Installation: Protecting Your Precious Cargo
Nothing is more important than the safety of your child, especially when traveling in a vehicle. Child safety seats, often referred to as car seats, are specifically designed to protect infants and children in the event of a crash. However, a car seat’s effectiveness hinges on its proper installation and use. Studies show that a significant percentage of car seats are installed incorrectly, leaving children vulnerable to serious injury. This comprehensive guide will walk you through the critical steps to ensure your child’s safety seat is correctly installed, providing you with peace of mind every time you hit the road.
Why Proper Installation Matters
Before diving into the how-to, it’s essential to understand why proper installation is paramount. An improperly installed car seat can:
- Fail to protect: In a collision, a loosely secured car seat may not stay in place, negating its ability to absorb impact and protect your child.
- Cause injury: If the car seat isn’t properly secured, the child can be thrown from the seat or collide with the vehicle’s interior.
- Void warranties: Incorrect installation can sometimes void the manufacturer’s warranty.
Essential Steps for Safe Installation
Follow these steps meticulously to ensure your child’s safety seat is correctly installed:
1. Choose the Right Car Seat:
- Age, Weight, and Height: Car seats are designed for specific age, weight, and height ranges. Carefully review the car seat’s label and your child’s measurements to ensure it’s the right fit.
- Car Seat Types:
- Rear-Facing Infant Seats: Designed for newborns and young infants, these seats provide the best protection by distributing crash forces across the child’s back.
- Convertible Seats: These seats can be used rear-facing and later converted to forward-facing as the child grows.
- Forward-Facing Seats with Harness: These seats are for older children who have outgrown the rear-facing position.
- Booster Seats: Booster seats raise the child so that the vehicle’s seat belt fits properly.
2. Read the Manuals:
- Car Seat Manual: This manual contains crucial information about the car seat’s features, installation instructions, and weight/height limits. Keep this manual in a safe place for future reference.
- Vehicle Owner’s Manual: Your vehicle’s manual provides information about the car’s LATCH system (if equipped), seat belt positioning, and any specific instructions for installing car seats.
3. Understand the LATCH System and Seat Belts:
- LATCH (Lower Anchors and Tethers for Children): This system provides a standardized way to install car seats using lower anchors and a top tether.
- Lower Anchors: These are metal bars located in the vehicle’s seat bight (where the seat back and cushion meet). Most vehicles have two lower anchors in at least two seating positions.
- Top Tether: This strap attaches to an anchor point in the vehicle, usually on the rear deck or seat back. The top tether reduces forward head movement in a crash.
- Seat Belts: If your vehicle doesn’t have LATCH or if the car seat’s weight exceeds the LATCH weight limit, you can use the vehicle’s seat belt to install the car seat.
- Locking Clip: Some seat belts have a locking clip that must be used to secure the car seat tightly.
4. Installation Steps:
A. Rear-Facing Installation:
- Position the Car Seat: Place the car seat in the rear-facing position in the vehicle seat. Ensure the seat is at the correct recline angle as indicated by the manufacturer.
- Attach Lower Anchors or Seat Belt:
- LATCH: Connect the car seat’s lower anchor connectors to the vehicle’s lower anchors. Ensure they click into place securely.
- Seat Belt: Route the seat belt through the car seat’s designated belt path. Buckle the seat belt and pull it tight to remove slack. Engage the locking mechanism (either the seat belt’s automatic locking retractor or a locking clip).
- Attach Top Tether (If Applicable): Some rear-facing car seats have a top tether. Connect the tether to the designated anchor point in the vehicle.
- Test for Movement: Grasp the car seat near the belt path and try to move it side to side and front to back. The car seat should move no more than 1 inch in any direction.
B. Forward-Facing Installation:
- Position the Car Seat: Place the car seat in the forward-facing position in the vehicle seat.
- Attach Lower Anchors or Seat Belt:
- LATCH: Connect the car seat’s lower anchor connectors to the vehicle’s lower anchors. Ensure they click into place securely.
- Seat Belt: Route the seat belt through the car seat’s designated belt path. Buckle the seat belt and pull it tight to remove slack. Engage the locking mechanism.
- Attach Top Tether: Connect the top tether to the designated anchor point in the vehicle. Tighten the tether strap.
- Test for Movement: Grasp the car seat near the belt path and try to move it side to side and front to back. The car seat should move no more than 1 inch in any direction.
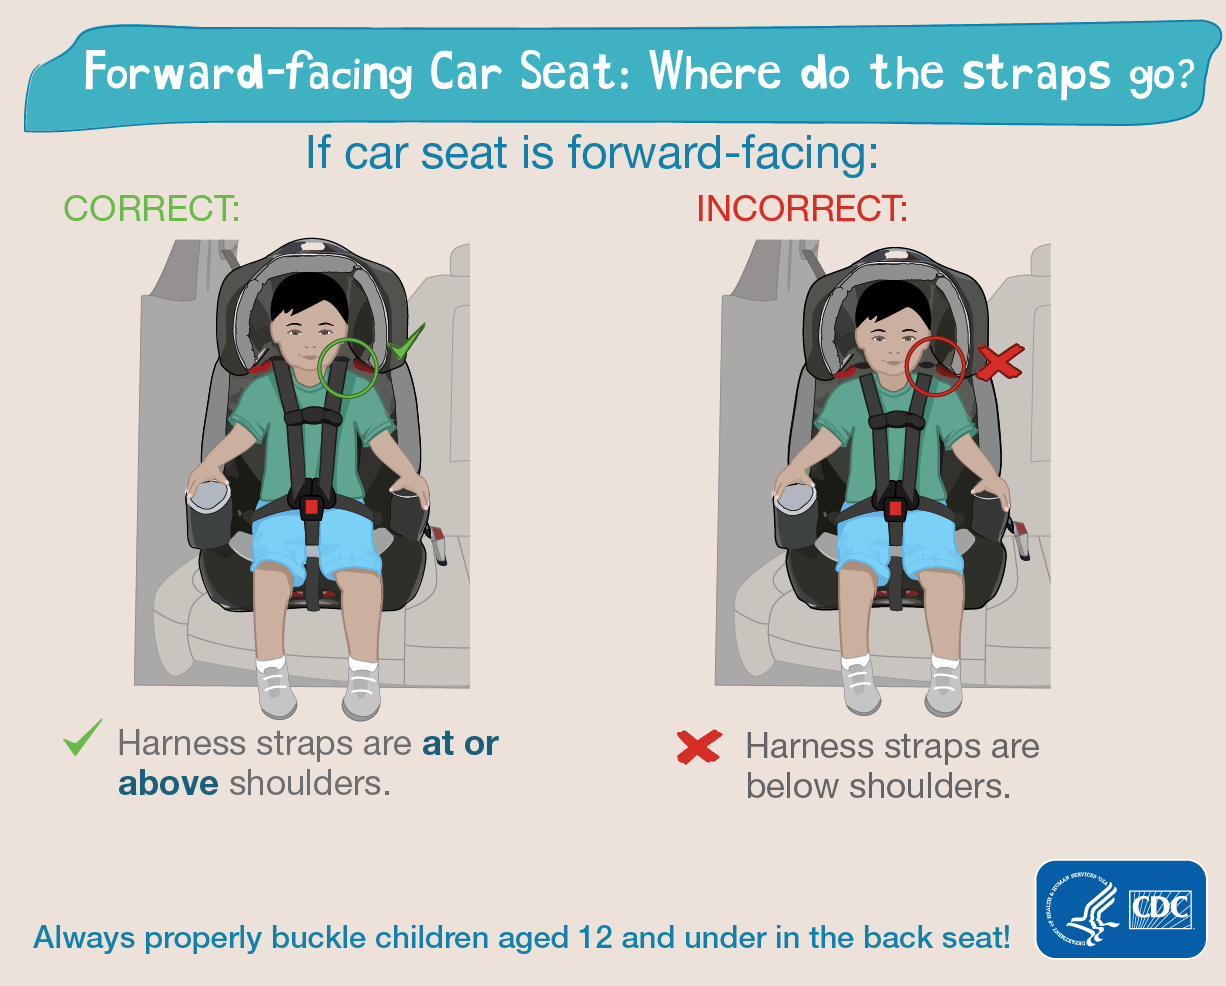
5. Harnessing Your Child:
- Position the Harness Straps:
- Rear-Facing: Harness straps should be at or below the child’s shoulders.
- Forward-Facing: Harness straps should be at or above the child’s shoulders.
- Buckle the Harness: Secure the harness buckle and chest clip.
- Tighten the Harness: Tighten the harness straps so that you cannot pinch any excess webbing at the child’s shoulder. The harness should be snug but not so tight that it restricts breathing.
- Position the Chest Clip: The chest clip should be positioned at armpit level.
6. Common Mistakes to Avoid:
- Loose Installation: This is the most common mistake. Ensure the car seat is tightly secured to the vehicle.
- Incorrect Harness Placement: Incorrect harness placement can compromise the car seat’s ability to protect your child.
- Using Expired Car Seats: Car seats have expiration dates. Do not use a car seat that is past its expiration date.
- Using Aftermarket Products: Do not use aftermarket products that were not designed for the car seat. These products can interfere with the car seat’s safety performance.
- Skipping the Top Tether: The top tether is a crucial safety feature for forward-facing car seats. Always use the top tether if available.
7. Getting Help from a Certified Child Passenger Safety Technician:
If you’re unsure about any aspect of car seat installation, seek help from a certified Child Passenger Safety Technician (CPST). CPSTs are trained to inspect car seats and provide guidance on proper installation and use. You can find a CPST in your area by visiting the National Highway Traffic Safety Administration (NHTSA) website or contacting your local fire department or hospital.
8. Ongoing Vigilance:
- Regular Checks: Periodically check the car seat’s installation to ensure it remains secure.
- Adjustments: As your child grows, you’ll need to adjust the harness straps and headrest to ensure a proper fit.
- Staying Informed: Stay up-to-date on car seat safety recommendations and best practices.
Conclusion
Properly installing and using a child safety seat is one of the most important things you can do to protect your child while traveling. By following these guidelines, you can ensure your child’s safety seat is correctly installed, providing them with the best possible protection in the event of a crash. Remember, your child’s safety is priceless, and taking the time to properly install their car seat is an investment in their well-being.
