How to Replace Your Radiator Cap: A Step-by-Step Guide
Your car’s radiator cap might seem like a small, insignificant part, but it plays a crucial role in maintaining your engine’s cooling system. This unassuming component regulates pressure within the cooling system, allowing it to operate at a higher temperature without boiling over. A faulty radiator cap can lead to a range of problems, from overheating and coolant loss to potential engine damage. Fortunately, replacing a radiator cap is a relatively simple and inexpensive task that most car owners can tackle themselves. This comprehensive guide will walk you through the process step-by-step, ensuring you can replace your radiator cap with confidence and keep your engine running smoothly.
Why is the Radiator Cap Important?
Before diving into the replacement process, it’s essential to understand the importance of the radiator cap and how it functions within the cooling system. The radiator cap performs several critical tasks:
-
Pressure Regulation: The primary function of the radiator cap is to maintain the correct pressure within the cooling system. As the engine heats up, the coolant expands. The radiator cap is designed with a spring-loaded valve that allows pressure to build up to a specific level, typically around 15-16 PSI (pounds per square inch). This increased pressure raises the boiling point of the coolant, preventing it from turning into steam and reducing the cooling efficiency.
-
Boiling Point Elevation: By increasing the pressure within the cooling system, the radiator cap raises the boiling point of the coolant. Water boils at 212°F (100°C) at sea level, but coolant mixtures (typically a 50/50 mix of water and antifreeze) have a slightly higher boiling point. The added pressure from the radiator cap can raise the boiling point by an additional 30-45°F (17-25°C), allowing the engine to operate at higher temperatures without the risk of boiling over.
-
Coolant Recovery: Many modern vehicles have a closed cooling system with a coolant reservoir or overflow tank. When the engine cools down, the coolant contracts, creating a vacuum within the system. The radiator cap has a second valve that opens when the pressure drops, allowing coolant to be drawn back from the reservoir into the radiator. This ensures that the cooling system remains full and prevents air pockets from forming.
Signs of a Bad Radiator Cap
A faulty radiator cap can manifest in several ways. Recognizing these symptoms early can help you prevent more significant problems:
-
Overheating: One of the most common signs of a bad radiator cap is engine overheating. If the cap cannot maintain the correct pressure, the coolant may boil over, leading to a rapid increase in engine temperature.
-
Coolant Leaks: A worn or damaged radiator cap may not seal properly, causing coolant to leak from the cap itself or the surrounding area. Look for signs of coolant residue or puddles near the radiator cap.
-
Low Coolant Level: If you notice that your coolant level is consistently low, even after topping it off, it could be a sign of a leaking radiator cap.
-
Coolant Overflow: A faulty radiator cap can cause coolant to overflow from the reservoir or overflow tank. This can happen if the cap is not maintaining the correct pressure or if the vacuum valve is not working properly.
-
Hoses Collapsing: When the engine cools down, the vacuum created in the cooling system should draw coolant back from the reservoir. If the radiator cap’s vacuum valve is not working, the hoses can collapse due to the pressure difference.
-
Rust or Corrosion: Inspect the radiator cap for signs of rust or corrosion. These can weaken the cap and prevent it from sealing properly.
Tools and Materials Needed
Before you begin, gather the necessary tools and materials:
-
New Radiator Cap: Purchase a replacement radiator cap that is specifically designed for your vehicle’s make and model. Check your owner’s manual or consult with an auto parts store to ensure you get the correct cap.
-
Gloves: Wear gloves to protect your hands from hot coolant and potential contaminants.
-
Rags or Shop Towels: Have rags or shop towels on hand to clean up any spills.
-
Pliers (Optional): Some radiator caps may be difficult to remove by hand, so a pair of pliers can be helpful.
-
Coolant (Optional): If you lose a significant amount of coolant during the replacement process, you may need to top it off. Use the correct type of coolant for your vehicle.
Step-by-Step Replacement Guide
Now that you have the tools and materials ready, follow these steps to replace your radiator cap:
-
Ensure the Engine is Cool: This is the most crucial step. Never attempt to remove the radiator cap when the engine is hot. The cooling system is under pressure, and removing the cap can cause scalding hot coolant to spray out, resulting in severe burns. Allow the engine to cool down completely before proceeding. Ideally, wait several hours or work on the vehicle when it has been sitting overnight.
-
Locate the Radiator Cap: The radiator cap is usually located on top of the radiator or on the coolant reservoir. It is typically a round cap with a pressure rating stamped on it (e.g., 16 PSI).
-
Release Pressure (If Necessary): Even if the engine has cooled down, there may still be some residual pressure in the cooling system. To release this pressure, carefully wrap a thick rag around the radiator cap and slowly turn it counterclockwise until you hear a hissing sound. This will release any remaining pressure. Once the hissing stops, you can safely remove the cap.
-
Remove the Old Radiator Cap: Grip the radiator cap firmly and turn it counterclockwise until it is free from the radiator neck or coolant reservoir. If the cap is difficult to turn, use a pair of pliers to get a better grip.
-
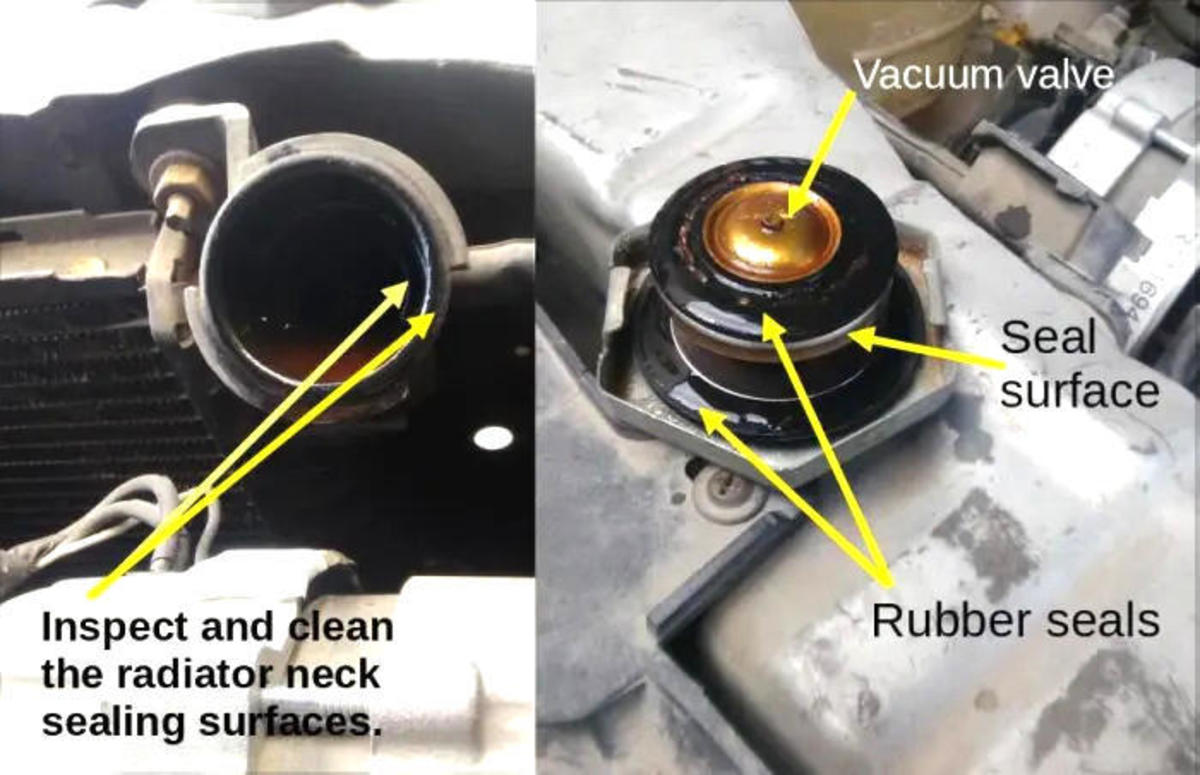
Inspect the Radiator Neck: Before installing the new radiator cap, inspect the radiator neck or coolant reservoir opening for any signs of damage, corrosion, or debris. Clean the area with a rag if necessary.
-
Install the New Radiator Cap: Align the new radiator cap with the radiator neck or coolant reservoir opening and press it down firmly. Turn the cap clockwise until it is snug and secure. Make sure the cap is properly seated and sealed.
-
Check Coolant Level (If Necessary): If you lost a significant amount of coolant during the replacement process, check the coolant level in the radiator or coolant reservoir. Top it off with the correct type of coolant if needed.
-
Test the Cooling System: After replacing the radiator cap, start the engine and let it run for a few minutes. Monitor the temperature gauge to ensure the engine is not overheating. Check for any coolant leaks around the radiator cap or the surrounding area.
Important Safety Precautions
- Never remove the radiator cap when the engine is hot. This is the most important safety precaution.
- Wear gloves to protect your hands from hot coolant and potential contaminants.
- Dispose of used coolant properly. Coolant is toxic and should not be poured down drains or onto the ground. Contact your local waste disposal facility for instructions on how to dispose of coolant safely.
- If you are not comfortable performing this task yourself, take your vehicle to a qualified mechanic.
Conclusion
Replacing a radiator cap is a simple and inexpensive task that can help keep your engine running smoothly and prevent more significant problems. By following these step-by-step instructions and taking the necessary safety precautions, you can replace your radiator cap with confidence and ensure your cooling system is functioning properly. Remember to always use the correct type of radiator cap for your vehicle and to inspect the cooling system regularly for any signs of leaks or damage. A well-maintained cooling system is essential for the longevity and performance of your engine.