How to Remove Car Emblems Like a Pro: A Comprehensive Guide
Car emblems, those shiny badges adorning your vehicle, serve as identifiers of make, model, and trim. While they add to the car’s aesthetics for some, others might prefer a cleaner, debadged look. Whether you’re aiming for a minimalist style, replacing damaged emblems, or customizing your ride, removing car emblems is a common DIY task. However, it’s crucial to approach this process with care to avoid damaging the paintwork and leaving unsightly marks. This comprehensive guide will walk you through the necessary tools, preparation steps, and removal techniques to achieve a professional-looking result.
Why Remove Car Emblems?
Before diving into the how-to, let’s explore the reasons why car owners choose to remove emblems:
- Aesthetic Preference: Many car enthusiasts prefer a cleaner, more streamlined appearance, opting to remove emblems for a minimalist look.
- Customization: Debadging allows for personalized customization. You might want to replace the stock emblems with aftermarket alternatives or create a unique design.
- Repair and Replacement: Damaged, faded, or broken emblems can detract from the car’s appearance. Removing them is necessary before installing new ones.
- Theft Deterrent: In some cases, removing emblems can make the car less identifiable, potentially deterring thieves who target specific models.
- Resale Value: Some people believe that removing badges can increase the resale value of their car.
Tools and Materials You’ll Need
Gathering the right tools and materials is essential for a successful emblem removal. Here’s a checklist:
- Heat Gun or Hair Dryer: Used to soften the adhesive backing of the emblems.
- Plastic Trim Removal Tools: These tools are designed to gently pry off emblems without scratching the paint. Avoid using metal tools, as they can cause damage.
- Fishing Line or Dental Floss: For slicing through the adhesive behind the emblem.
- Goo Gone or Adhesive Remover: To dissolve and remove any remaining adhesive residue.
- Microfiber Towels: Soft, lint-free towels for cleaning and polishing.
- Wax and Grease Remover: To clean the area before applying wax or sealant.
- Car Wax or Sealant: To protect the exposed paint and restore its shine.
- Masking Tape: To protect the surrounding paint and create a guide for emblem placement (if reinstalling).
- Spray Bottle with Warm, Soapy Water: For cleaning the area before and after emblem removal.
- Gloves: To protect your hands from chemicals and heat.
Preparation is Key
Proper preparation is crucial to minimize the risk of damage and ensure a smooth removal process. Follow these steps:
- Wash and Dry the Area: Thoroughly clean the area around the emblems with warm, soapy water. This removes dirt, grime, and any contaminants that could scratch the paint during the removal process. Dry the area completely with a microfiber towel.
- Mask the Surrounding Paint: Use masking tape to protect the paint around the emblems. This will prevent accidental scratches from the trim removal tools or fishing line.
- Warm the Emblems: Using a heat gun or hair dryer, gently warm the emblems. Apply heat in a sweeping motion, keeping the heat source a few inches away from the surface. The goal is to soften the adhesive without overheating the paint. Be careful not to concentrate the heat in one spot for too long, as this could damage the paint.
Emblem Removal Techniques
There are several methods for removing car emblems, each with its own advantages and disadvantages. Here are the most common techniques:
-
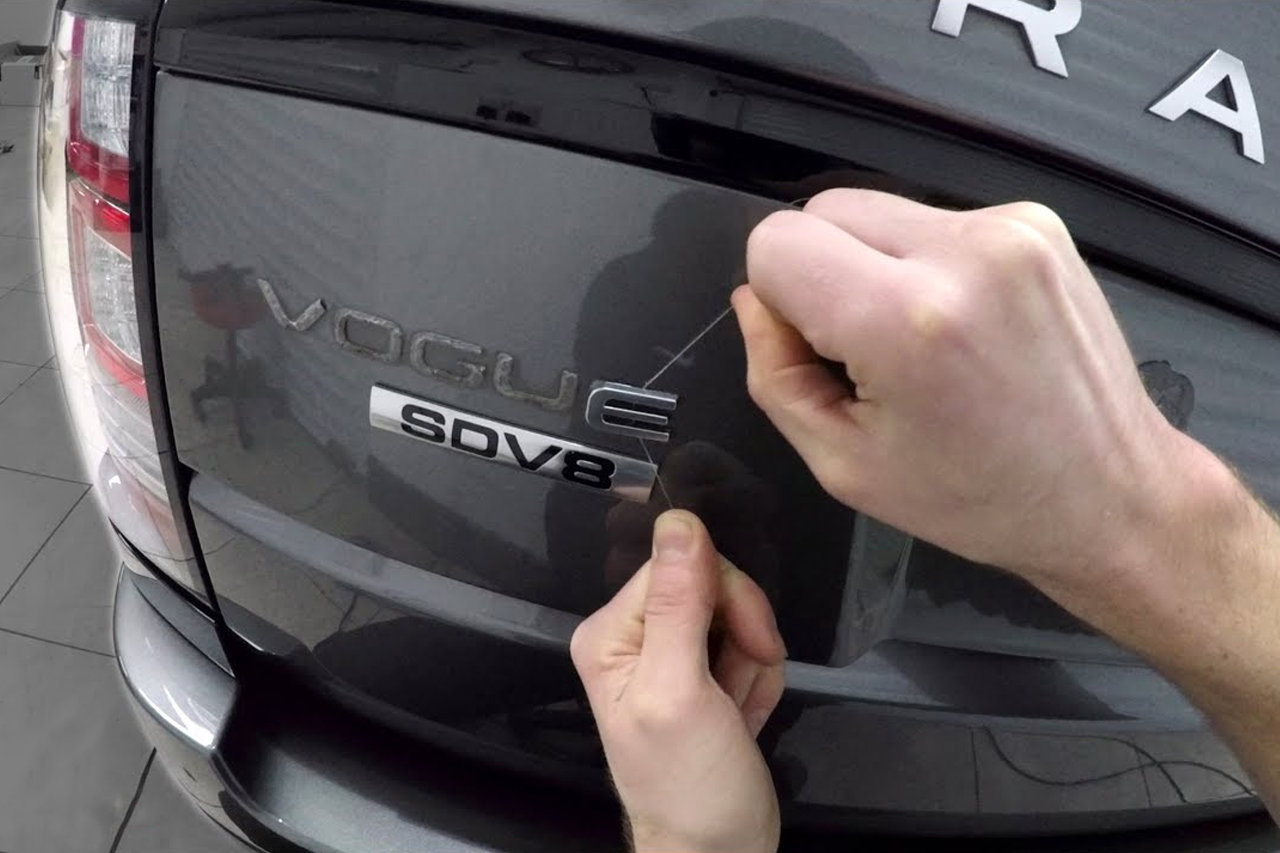
Fishing Line/Dental Floss Method:
- This is a safe and effective method for most emblems.
- Take a length of fishing line or dental floss and carefully slide it behind the emblem, using a sawing motion to cut through the adhesive.
- Work your way around the entire emblem, gradually separating it from the car’s surface.
- Once the emblem is loose, gently peel it off.
-
Plastic Trim Removal Tool Method:
- This method is best for emblems that are not too tightly adhered.
- Insert the plastic trim removal tool behind the edge of the emblem.
- Gently pry the emblem away from the car’s surface, working your way around the edges.
- Apply steady pressure, but avoid forcing the tool, as this could damage the paint.
-
Combination Method:
- For stubborn emblems, a combination of the fishing line and trim removal tool methods may be necessary.
- Start by using the fishing line to cut through as much of the adhesive as possible.
- Then, use the trim removal tool to gently pry the remaining sections of the emblem.
Removing Adhesive Residue
After removing the emblems, you’ll likely be left with adhesive residue on the paint. Here’s how to remove it:
- Apply Adhesive Remover: Spray Goo Gone or another adhesive remover onto the residue. Let it sit for a few minutes to soften the adhesive.
- Wipe Away the Residue: Use a clean microfiber towel to wipe away the softened adhesive. Apply gentle pressure and repeat the process as needed until all the residue is gone.
- Clean the Area: Once the adhesive is removed, clean the area with a wax and grease remover to prepare the surface for waxing or sealing.
Protecting the Paint
After removing the emblems and adhesive, it’s essential to protect the exposed paint.
- Apply Car Wax or Sealant: Apply a coat of car wax or sealant to the area where the emblems were removed. This will protect the paint from the elements and restore its shine.
- Buff the Area: Use a clean microfiber towel to buff the waxed or sealed area, removing any excess product and creating a smooth, glossy finish.
Reinstalling Emblems (Optional)
If you’re reinstalling the emblems, follow these steps:
- Clean the Emblems: Clean the emblems thoroughly with soap and water.
- Apply New Adhesive: Apply new automotive-grade adhesive to the back of the emblems.
- Position the Emblems: Carefully position the emblems in the desired location, using the masking tape as a guide if necessary.
- Press Firmly: Press the emblems firmly onto the car’s surface, holding them in place for a few minutes to allow the adhesive to bond.
- Remove Masking Tape: Carefully remove the masking tape.
- Allow Time to Cure: Allow the adhesive to cure completely according to the manufacturer’s instructions.
Tips and Precautions
- Work in a Well-Ventilated Area: When using adhesive removers, work in a well-ventilated area to avoid inhaling harmful fumes.
- Test Adhesive Remover: Before applying adhesive remover to the entire area, test it on a small, inconspicuous spot to ensure it doesn’t damage the paint.
- Be Patient: Emblem removal can take time and patience. Don’t rush the process, as this could lead to mistakes and damage.
- Use Heat Sparingly: Avoid overheating the emblems or the paint, as this can cause damage.
- Consult a Professional: If you’re unsure about any step of the process, consult a professional auto detailer or body shop.
Conclusion
Removing car emblems is a relatively straightforward DIY task that can enhance your vehicle’s appearance. By following these steps and taking the necessary precautions, you can achieve a professional-looking result without damaging your car’s paint. Whether you’re aiming for a minimalist look, replacing damaged emblems, or customizing your ride, this guide provides the knowledge and techniques to tackle the job with confidence.