How to Fix Minor Dents in Your Car: A DIY Guide to Restoring Your Ride
Dents happen. Whether it’s a runaway shopping cart, a stray baseball, or a clumsy encounter with a garage door, those unsightly blemishes can quickly detract from your car’s appearance and even its value. While major damage necessitates professional repair, many minor dents can be effectively addressed with a little patience, the right tools, and a DIY approach. This guide will walk you through several methods for fixing minor dents, empowering you to restore your car’s smooth finish and save money in the process.
Before You Begin: Assessing the Damage
Not all dents are created equal. Before diving into any repair method, it’s crucial to assess the damage to determine if a DIY fix is appropriate. Consider the following:
- Size and Depth: Smaller, shallower dents are generally easier to repair than larger, deeper ones. Dents that are more than a few inches across or that have sharply creased metal may require professional attention.
- Location: Dents on flat, easily accessible panels are simpler to fix than those in corners, along body lines, or in hard-to-reach areas.
- Paint Damage: If the paint is cracked, chipped, or deeply scratched, the repair will likely require touch-up paint or even professional repainting after the dent is removed. Minor scratches can sometimes be buffed out.
- Metal Type: Aluminum panels are more difficult to work with than steel. If your car has aluminum body panels and the dent is significant, it’s best to consult a professional.
If you’re unsure whether a DIY repair is feasible, it’s always wise to get a professional opinion. They can assess the damage and provide guidance on the best course of action.
Method 1: The Boiling Water Technique
This method is best suited for dents in plastic bumpers. The heat from the boiling water makes the plastic more flexible, allowing it to be pushed back into shape.
- What You’ll Need:
- Boiling water
- Heat-resistant gloves
- A large bowl or kettle
- A soft cloth or towel
- Steps:
- Boil Water: Bring a kettle or large pot of water to a boil.
- Pour Water: Carefully pour the boiling water over the dented area. Be cautious to avoid burns. The heat will make the plastic more pliable.
- Reach Behind the Bumper: Wearing heat-resistant gloves, reach behind the bumper and gently push the dent outwards. You may need to apply firm, steady pressure.
- Alternate Hot and Cold: If the dent is stubborn, alternate pouring boiling water with applying cold water (e.g., from a hose) to help the plastic retain its shape. The sudden change in temperature can help the plastic ‘pop’ back into place.
- Repeat as Needed: Repeat the process several times until the dent is significantly reduced or eliminated.
- Dry and Inspect: Once you’re satisfied, dry the area with a soft cloth and inspect the results.
Important Note: Be extremely careful when handling boiling water to avoid burns. This method is most effective on relatively new dents in warm weather.
Method 2: The Hair Dryer and Compressed Air Technique
This method utilizes heat and rapid cooling to manipulate the metal. It works best on shallow dents in metal panels.
- What You’ll Need:
- Hair dryer
- Compressed air (canned air used for cleaning electronics is sufficient)
- Gloves
- Steps:
- Heat the Dent: Using the hair dryer on its highest setting, heat the dented area for several minutes. Keep the hair dryer moving to avoid overheating the paint. The goal is to make the metal slightly more flexible.
- Apply Compressed Air: Wearing gloves to protect your hands from the cold, hold the can of compressed air upside down and spray it directly onto the heated dent. Holding the can upside down releases a freezing agent.
- Observe the Dent: The rapid cooling caused by the compressed air can cause the metal to contract and potentially pop back into its original shape.
- Repeat as Needed: Repeat the heating and cooling process several times until the dent is reduced or eliminated.
- Inspect: After the process, inspect the area for any remaining blemishes.
Important Note: Be careful not to overheat the paint, as this can cause damage. Apply the compressed air in short bursts.
Method 3: The Plunger Method
This method uses suction to pull the dent out. It’s most effective on larger, shallower dents on relatively flat surfaces.
- What You’ll Need:
- A cup-shaped plunger (a toilet plunger can work, but a new, clean one is recommended)
- Water
- Soft cloths or towels
- Steps:
- Clean the Area: Thoroughly clean the dented area and the surrounding paint with soap and water.
- Wet the Plunger and the Area: Wet the rim of the plunger and the area around the dent with water. This will create a better seal.
- Position the Plunger: Center the plunger over the dent.
- Apply Pressure and Pull: Press the plunger firmly against the panel to create a seal. Then, pull the plunger straight outwards with a strong, steady motion.
- Repeat as Needed: Repeat the process several times, repositioning the plunger slightly each time, until the dent is reduced or eliminated.
- Dry and Inspect: Dry the area with a soft cloth and inspect the results.
Important Note: This method may not work on dents with sharp creases or on areas with complex curves.
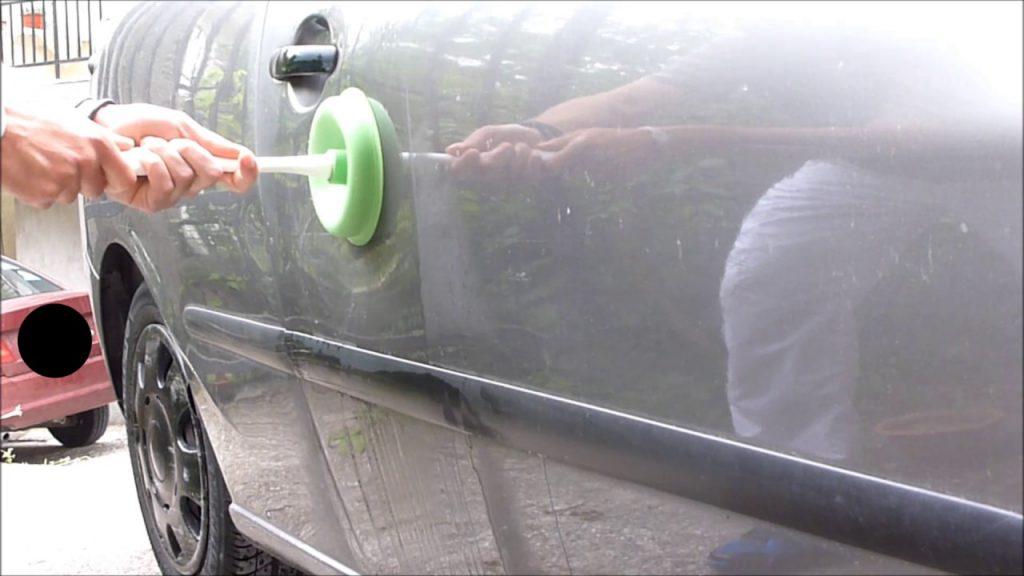
Method 4: Dent Removal Kits (Glue Pulling)
Dent removal kits, often referred to as glue pulling kits, are a more advanced DIY option that can be very effective on a variety of dents. They use specialized glue and pulling tools to gently pull the dent outwards.
- What You’ll Need:
- A dent removal kit (containing glue gun, glue sticks, various sized pulling tabs, and a slide hammer or pulling bridge)
- Rubbing alcohol
- A plastic scraper
- Soft cloths
- Steps:
- Clean the Area: Thoroughly clean the dented area with rubbing alcohol to remove any wax, grease, or dirt.
- Select a Pulling Tab: Choose a pulling tab that is slightly smaller than the dent.
- Apply Glue: Heat the glue gun and apply a generous amount of glue to the pulling tab.
- Attach the Tab: Quickly press the glued tab firmly onto the center of the dent. Hold it in place for a few minutes to allow the glue to set completely.
- Use the Pulling Tool: Attach the slide hammer or pulling bridge to the pulling tab. Follow the instructions that came with your kit. Gently pull the dent outwards using short, controlled pulls.
- Remove the Tab: Once the dent is reduced or eliminated, carefully remove the pulling tab. You can usually do this by twisting it or using a plastic scraper to break the glue bond.
- Remove Glue Residue: Remove any remaining glue residue with rubbing alcohol and a soft cloth.
- Repeat as Needed: Repeat the process with different sized tabs and pulling techniques until you achieve the desired results.
Important Note: Practice on an inconspicuous area or a piece of scrap metal before working on the visible area of your car. Patience and a gentle touch are key to success.
After the Repair: Finishing Touches
Once you’ve successfully removed or significantly reduced the dent, there are a few finishing touches you can apply to improve the appearance of the repair:
- Buffing: If there are any minor scratches or imperfections in the paint, you can use a polishing compound and a soft cloth to buff the area and restore the shine.
- Touch-Up Paint: If the paint is chipped or scratched, apply touch-up paint to protect the exposed metal and prevent rust.
- Waxing: After any paint repairs, apply a coat of wax to protect the paint and enhance its shine.
When to Call a Professional
While these DIY methods can be effective for minor dents, there are situations where professional help is necessary:
- Large or Deep Dents: Dents that are too large or deep for DIY repair.
- Dents in Complex Areas: Dents in corners, along body lines, or in hard-to-reach areas.
- Significant Paint Damage: Dents with cracked, chipped, or deeply scratched paint.
- Aluminum Body Panels: Dents in aluminum panels that require specialized tools and techniques.
- If You’re Not Comfortable: If you’re not comfortable performing the repair yourself, it’s always best to consult a professional.
Conclusion
Fixing minor dents in your car can be a rewarding DIY project that saves you money and restores your car’s appearance. By carefully assessing the damage, choosing the appropriate method, and following the steps outlined in this guide, you can achieve professional-looking results. Remember to be patient, take your time, and don’t hesitate to seek professional help if needed. With a little effort, you can keep your car looking its best for years to come.
