How to Remove Stuck Lug Nuts: A Comprehensive Guide
Lug nuts, those seemingly simple fasteners that hold your wheels securely onto your vehicle, can become a formidable adversary when they refuse to budge. Whether due to over-tightening, rust, corrosion, or a combination of factors, stuck lug nuts can turn a routine tire change or brake job into a frustrating ordeal. However, fear not! With the right tools, techniques, and a bit of patience, you can conquer even the most stubborn lug nuts. This comprehensive guide will walk you through various methods, providing step-by-step instructions and essential tips to help you remove stuck lug nuts safely and effectively.
Understanding the Enemy: Why Lug Nuts Get Stuck
Before diving into the removal process, it’s helpful to understand why lug nuts get stuck in the first place. Here are some common culprits:
- Over-Tightening: This is perhaps the most frequent cause. Lug nuts are designed to be tightened to a specific torque, measured in foot-pounds (ft-lbs) or Newton-meters (Nm). Overtightening, often done by using impact wrenches without torque limiters, stretches the stud threads and creates excessive friction, making removal difficult.
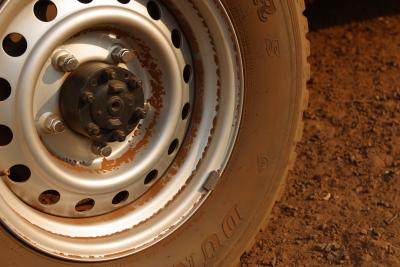
- Rust and Corrosion: Exposure to moisture, salt, and road grime can lead to rust and corrosion on the lug nuts and wheel studs. This corrosion acts like glue, bonding the nuts to the studs.
- Cross-Threading: If a lug nut is not properly aligned when initially installed, it can become cross-threaded. This damages the threads and makes removal extremely challenging.
- Galvanic Corrosion: When dissimilar metals (e.g., steel lug nuts and aluminum wheels) come into contact in the presence of an electrolyte (like water), galvanic corrosion can occur. This process causes one metal to corrode faster than the other, creating a strong bond between the lug nut and the wheel.
- Improper Lubrication: While it might seem counterintuitive, dry threads can actually increase friction and make lug nuts harder to remove. Applying a small amount of anti-seize compound to the threads during installation can help prevent this issue.
Essential Tools for the Job
Having the right tools is crucial for successfully removing stuck lug nuts. Here’s a list of essential items:
- Lug Wrench: A standard lug wrench is the most basic tool for removing lug nuts. However, for stuck nuts, you’ll likely need something more powerful.
- Breaker Bar: A breaker bar is a long, sturdy handle that provides extra leverage. It significantly increases the amount of torque you can apply to the lug nut.
- Socket Set: A socket set with the correct size sockets for your lug nuts is essential. Make sure to use a six-point socket, as it provides a better grip and is less likely to round off the nut.
- Penetrating Oil: Penetrating oil, such as WD-40, Liquid Wrench, or PB Blaster, helps to loosen rust and corrosion.
- Hammer: A hammer can be used to gently tap the lug wrench or breaker bar to help break the nut free.
- Heat Source (Optional): A propane torch or heat gun can be used to heat the lug nut, which can help to break the bond caused by rust or corrosion. Use with caution and only if you are comfortable using these tools.
- Torque Wrench: A torque wrench is essential for properly tightening the lug nuts after they have been removed.
- Gloves and Safety Glasses: Protect your hands and eyes from debris and chemicals.
- Wheel Chocks: Always use wheel chocks to prevent the vehicle from rolling while you’re working on it.
Methods for Removing Stuck Lug Nuts
Here are several methods you can try to remove stuck lug nuts, starting with the simplest and progressing to more advanced techniques:
1. The Standard Lug Wrench Method (with Added Leverage):
- Safety First: Park the vehicle on a level surface, engage the parking brake, and use wheel chocks to secure the wheels.
- Apply Penetrating Oil: Spray penetrating oil liberally around the lug nut, allowing it to soak for at least 15-30 minutes. Reapply as needed.
- Position the Wrench: Place the lug wrench on the nut, ensuring it’s seated securely.
- Apply Force: Using your body weight, push or pull on the wrench in a counter-clockwise direction (when facing the nut). If possible, use your foot to apply additional force while keeping your balance.
- If it Doesn’t Budge: Don’t force it too much. Move on to the next method.
2. The Breaker Bar Method:
- Follow Steps 1 and 2 from the previous method.
- Attach the Socket: Select the correct size socket and attach it to the breaker bar.
- Position the Breaker Bar: Place the socket onto the lug nut, ensuring it’s seated securely.
- Apply Leverage: Use both hands to pull or push on the breaker bar in a counter-clockwise direction. The longer handle provides significantly more leverage.
- Controlled Force: Apply steady, controlled force rather than jerky movements.
- Hammer Assist: If needed, gently tap the end of the breaker bar with a hammer to help break the nut free.
- Repeat: If the nut still doesn’t move, reapply penetrating oil and try again.
3. The Impact Wrench Method:
- Safety Precautions: Wear safety glasses and hearing protection.
- Air or Electric: Impact wrenches can be powered by compressed air or electricity. Ensure you have the correct power source and connections.
- Select the Right Socket: Use an impact-rated socket of the correct size. These sockets are designed to withstand the high torque generated by impact wrenches.
- Set the Torque: Some impact wrenches have adjustable torque settings. Start with a lower setting and gradually increase it as needed.
- Apply Pressure: Place the socket onto the lug nut and apply firm, steady pressure while activating the impact wrench.
- Short Bursts: Use short bursts of power rather than continuous operation. This helps prevent rounding off the nut.
- Check Progress: After each burst, check to see if the nut has loosened.
- Caution: Be careful not to overtighten the lug nuts when reinstalling them with an impact wrench. Use a torque stick or manually torque the lug nuts to the correct specification.
4. The Heat Method (Use with Extreme Caution):
- Safety First: This method involves using heat, which can be dangerous. Wear safety glasses, gloves, and work in a well-ventilated area. Avoid using heat near flammable materials or on wheels with tires installed.
- Apply Heat: Use a propane torch or heat gun to heat the lug nut evenly for a short period (15-30 seconds). The heat will expand the metal and help break the bond caused by rust or corrosion.
- Penetrating Oil: Immediately after heating, apply penetrating oil to the lug nut.
- Attempt Removal: Use the breaker bar or impact wrench method to try to remove the nut.
- Cool Down: Allow the lug nut to cool down before touching it.
5. The Nut Splitter Method (Last Resort):
- Damage Risk: This method involves physically splitting the lug nut, which will destroy it. Only use this as a last resort if all other methods have failed.
- Position the Splitter: Place the nut splitter around the lug nut, ensuring the cutting blade is positioned correctly.
- Tighten the Splitter: Tighten the nut splitter until it splits the lug nut.
- Remove the Nut: Once the nut is split, you should be able to remove it.
- Replace Stud: Be prepared to replace the wheel stud if it is damaged during the process.
Important Tips and Considerations
- Work Safely: Always prioritize safety. Wear safety glasses and gloves, and use wheel chocks to prevent the vehicle from rolling.
- Patience is Key: Don’t rush the process. Apply penetrating oil and allow it to soak for an extended period.
- Avoid Rounding Off: Use a six-point socket and apply steady, controlled force to avoid rounding off the lug nut.
- Check the Threads: After removing the lug nut, inspect the wheel stud threads for damage. If the threads are damaged, you may need to replace the stud.
- Use Anti-Seize: When reinstalling the lug nuts, apply a small amount of anti-seize compound to the threads to prevent them from getting stuck in the future.
- Torque Properly: Use a torque wrench to tighten the lug nuts to the manufacturer’s specified torque. This is crucial for ensuring the wheels are securely attached and preventing future problems.
- Seek Professional Help: If you’ve tried multiple methods and still can’t remove the lug nuts, it’s best to seek professional help from a mechanic or tire shop. They have specialized tools and expertise to handle even the most stubborn lug nuts.
By following these methods and tips, you can successfully remove stuck lug nuts and get back on the road safely. Remember to prioritize safety, use the right tools, and be patient. Good luck!
